I have recently discovered that cooking with a cast iron skillet is the sexiest thing you can do in the kitchen.
The multipurpose cooking vessel perfectly browns everything from corn bread to bread pudding and seriously sears the most perfect filet creating a crust on the exterior of the meat, which can then be topped with butter and finished in the oven!
Kenny and I got our inspiration to buy a cast iron from watching The Pioneer Woman-Ree Drummond on food network. Click on this link to see just SOME of her amazing recipes. She uses her cast iron for everything! Sweet, savory, appetizers, dinner, desserts. I love watching her show!
So, we wound up buying one and I just had my first delicious and browned experience the other night and I had to share it with you guys!
First things first, here is some cooking with cast iron info.
You may have heard that a cast iron needs to be properly "seasoned" before use. What that means is, the cast iron you buy in the store may not be seasoned, which means the skillet is not yet "nonstick". To season a cast-iron skillet you use about a tablespoon of your favorite cooking oil, I used vegetable oil, and coat the interior of the pan using a paper towel. After the oil coating put your skillet in a 400 degree oven upside down on the lowest baking rack, put tinfoil down on the very bottom of your oven incase of dripping excess oil. Bake for at least 1 hour. Turn the oven off and let skillet cool in the oven. After the skillet is cooled your skillet is properly seasoned! Store your cast iron in a dry place and it is ready to use!
This seasoning process can be used again as necessary. Like if you find food is sticking to the service, no worries, just season it again! Honestly, it may take a few times. The more you cook with a cast iron the better the natural seasoning gets.
Now, here is what I mean when I say natural seasoning. After you are finished cooking in your skillet there is a proper way to clean your skillet. A rough brush and some warm water, maybe a rubber scrapper, is all you need. NO SOAP is needed becauseeeee after you "wash" your skillet, you will dry the skillet completely, coat it again with a thin coating of cooking oil and then it is ready to cook your next meal. Cooking in, washing correctly and keeping up with the seasoning will help you keep your cast iron for a lifetime.
Check out these videos from Lodge, the cast iron company we bought from, and read their tips on how to use and take care of your cast iron!
Here is what makes cooking with a cast iron so much fun. Because the pan is made of cast iron heat will evenly distribute throughout the entire surface of the pan. Other nonstick or stainless steal absorb heat mainly in the middle and then disperse it to the outer edges leaving your crostini, steak, cornbread, what have you, unevenly browned or seared.
Note: Since the cast iron evenly distributes heat throughout the pan you have to be extra cautious. I accidentally brushed my pinky against the handle and burned myself. It was minor, but was still no fun.
Also! the cast iron can be used on the stove top or in the oven! Barefoot Contessa sears a gorgeous steak and then finishes it in the oven. Check out her recipe and her use of the cast iron!
Now, back to the good stuff. :)
If you ever need a quick crostini, here's what I did.
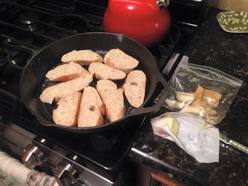
While the cast iron was heating on a medium high heat I sliced on a diagonal a beautiful french baguette. I then added a few tablespoons of butter and 3 crushed cloves of garlic.
Personally, I LOVE the flavor and aroma of garlic, but I'm not the biggest fan of eating pieces of it. Crushing the cloves as you peel them and then adding them to the butter whole, but crushed, infuses the butter with the amazing and comforting flavor. After about 5 mins I discard the crushed garlic cloves and I am left with beautifully infused garlic butter ready to toast bread! Yum!
You may have heard that a cast iron needs to be properly "seasoned" before use. What that means is, the cast iron you buy in the store may not be seasoned, which means the skillet is not yet "nonstick". To season a cast-iron skillet you use about a tablespoon of your favorite cooking oil, I used vegetable oil, and coat the interior of the pan using a paper towel. After the oil coating put your skillet in a 400 degree oven upside down on the lowest baking rack, put tinfoil down on the very bottom of your oven incase of dripping excess oil. Bake for at least 1 hour. Turn the oven off and let skillet cool in the oven. After the skillet is cooled your skillet is properly seasoned! Store your cast iron in a dry place and it is ready to use!
This seasoning process can be used again as necessary. Like if you find food is sticking to the service, no worries, just season it again! Honestly, it may take a few times. The more you cook with a cast iron the better the natural seasoning gets.
Now, here is what I mean when I say natural seasoning. After you are finished cooking in your skillet there is a proper way to clean your skillet. A rough brush and some warm water, maybe a rubber scrapper, is all you need. NO SOAP is needed becauseeeee after you "wash" your skillet, you will dry the skillet completely, coat it again with a thin coating of cooking oil and then it is ready to cook your next meal. Cooking in, washing correctly and keeping up with the seasoning will help you keep your cast iron for a lifetime.
Check out these videos from Lodge, the cast iron company we bought from, and read their tips on how to use and take care of your cast iron!
Here is what makes cooking with a cast iron so much fun. Because the pan is made of cast iron heat will evenly distribute throughout the entire surface of the pan. Other nonstick or stainless steal absorb heat mainly in the middle and then disperse it to the outer edges leaving your crostini, steak, cornbread, what have you, unevenly browned or seared.
Note: Since the cast iron evenly distributes heat throughout the pan you have to be extra cautious. I accidentally brushed my pinky against the handle and burned myself. It was minor, but was still no fun.
Also! the cast iron can be used on the stove top or in the oven! Barefoot Contessa sears a gorgeous steak and then finishes it in the oven. Check out her recipe and her use of the cast iron!
Now, back to the good stuff. :)
If you ever need a quick crostini, here's what I did.
While the cast iron was heating on a medium high heat I sliced on a diagonal a beautiful french baguette. I then added a few tablespoons of butter and 3 crushed cloves of garlic.
Personally, I LOVE the flavor and aroma of garlic, but I'm not the biggest fan of eating pieces of it. Crushing the cloves as you peel them and then adding them to the butter whole, but crushed, infuses the butter with the amazing and comforting flavor. After about 5 mins I discard the crushed garlic cloves and I am left with beautifully infused garlic butter ready to toast bread! Yum!
 | 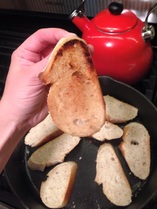 |
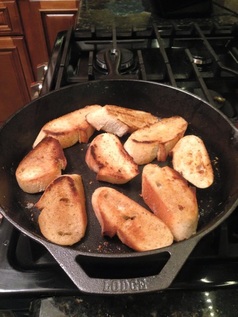
After the butter is melted I take my slices of baguette and move them around the buttered cast iron and let them get beautifully aquatinted and browned. Keep and eye on them, when browned, add more butter and flip to non toasted side. After about 10 minutes total you are left with perfectly toasted garlic bread crustini!
Perfect for antipasta platters, fresh slices of mozzarella cheese and roasted red peppers, your favorite dip or even to soak up the last of your soup.
Check out my Bruschetta food post to see what I added on top of my toasted beauties!
Definitely more cast iron recipes and facts to come!
Perfect for antipasta platters, fresh slices of mozzarella cheese and roasted red peppers, your favorite dip or even to soak up the last of your soup.
Check out my Bruschetta food post to see what I added on top of my toasted beauties!
Definitely more cast iron recipes and facts to come!
 RSS Feed
